A baby garment is more than tiny fabric folded into a shape – its edges are where comfort, safety, and style meet. The way a neckline, sleeve, or hem is finished - the binding – can quietly determine how a piece feels against delicate skin, how it stretches with movement, and how it wears after a dozen washes. In short, binding is a small detail with a big job.
This article will guide you through the common types of baby clothes binding: what they look like, how they behave, and why a designer or parent might choose one over another. From snug rib cuffs to soft fold-over finishes, each method balances stretch, durability, and ease of use differently. Whether you’re sewing yoru first onesie, sourcing for a brand, or simply curious, understanding binding helps you make choices that keep little ones comfortable and garments working their best.
Table of Contents
- Common Binding Types Explained with Practical Pros and Cons
- Seams That protect Delicate Skin and Maintain Shape: Stitch Types and Thread recommendations
- Edges and Finishes That Prevent Chafing and Stretch: Turned Hems, Bias Tape, and Ribbed Bands
- Reinforcement and Care Tips to Extend Wearability: Washing , Stitch Repair, and When to Reinforce Seams
- Choosing Factory Finishes Versus Hand Techniques: Tailoring Recommendations for Fit, Comfort, and Durability
- Q&A
- To Conclude
Common Binding Types Explained with Practical Pros and Cons
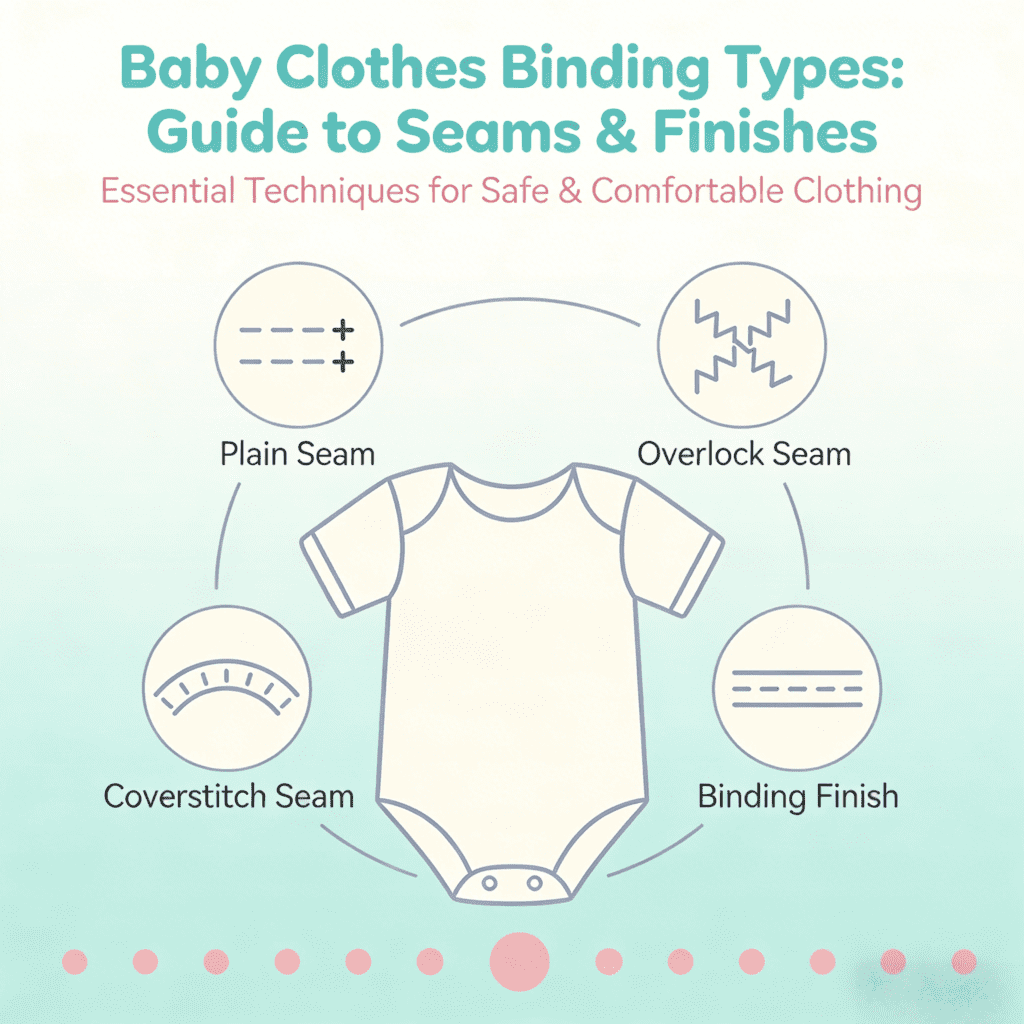
Tiny seams make a big difference: the way a neckline or cuff is finished affects stretch, chafe, and how long a garment survives the laundry cycle. Common approaches, like bias binding, serged/overlock finishes, and French seams, each balance softness, bulk, and durability differently. For newborns, you’ll often favor finishes that minimize raw edges and pressure points; for active toddlers, durability and recovery are key.
Here’s a practical look at what each finish brings to the nursery closet. Bias binding wraps raw edges with a soft folded tape for a neat, decorative edge, but can add a little bulk; serged seams are fast and stretchy but leave exposed thread ends; French seams encase raw edges for a smooth interior but take more fabric and sewing time.
- Bias binding - Pros: soft edge, decorative; Cons: can feel bulky at corners.
- Serged/Overlock - Pros: stretchy, tidy from the outside; Cons: exposed thread can irritate very sensitive skin.
- French seam – Pros: ultra-smooth inside, durable; Cons: more fabric and labor needed.
- Double-fold hem - Pros: neat, stable; Cons: less stretch on knits.
| Type | Softness | Durability | Best For |
|---|---|---|---|
| Bias binding | high | Medium | Necklines, cuffs |
| Serged | Medium | High | Everyday playwear |
| french seam | Very High | High | Delicate garments |
Seams That Protect Delicate Skin and Maintain Shape: Stitch Types and Thread Recommendations
Comfort begins at the seam: choose stitches that lie flat, avoid bulky ridges, and allow stretch where the fabric needs to move. Ideal options include:
- Flatlock – creates a nearly seamless, flat join ideal for necklines and leg openings on knits.
- French seams – fully encase raw edges for woven fabrics, preventing abrasion and fraying against baby’s skin.
- Overlock/serger – trims and finishes in one pass; use a narrow seam allowance and differential feed for stable, neat edges.
- Mock flat-felled – gives the strength of a felled seam without the bulk, perfect for durable baby bottoms and jackets.
- Zigzag or stretch stitch – allows recovery in active areas like cuffs and crotches while keeping seams gentle.
Thread choice is as vital as stitch selection: opt for smooth, low-lint threads and match elasticity to the fabric. A quick reference table helps match common threads to their best uses and useful tips for lasting, skin-friendly finishes.
| Thread Type | Best For | quick Tip |
|---|---|---|
| Core-spun polyester | Everyday seams on knits & wovens | Durable,low-lint – use 50wt for general sewing. |
| Cotton-wrapped polyester | Soft hand for woven baby garments | Balanced strength and softness; pre-wash to reduce shrinkage. |
| woolly nylon/stretch looper | Hems and coverstitch on active knitwear | Creates a plush, stretchy seam that won’t dig into skin. |
Edges and Finishes That Prevent Chafing and Stretch: Turned Hems, Bias Tape, and Ribbed Bands
Soft, finished edges are the unsung heroes of baby garments – they keep delicate skin safe and seams flexible. A narrow turned hem (folded twice and stitched close to the fold) buries raw fabric and creates a cushioned edge that resists fraying without adding bulk. For curved openings like necklines or armholes, bias tape cut on the grain gives a gentle give that moves with the baby; it wraps and reinforces the seam, preventing sharp seam allowances from rubbing while keeping the garment shape intact.
For openings that need to stretch and snap back – cuffs, waistbands, and neck trims – ribbed bands are ideal. Their knit construction provides high recovery, so sleeves and hems won’t splay after washing or wear. When paired with a slightly shorter body or sleeve (negative ease), ribbed bands create a snug, chafe-free seal that’s comfortable against skin yet easy to pull on and off.
Practical finishing tips to reduce irritation and overstretching:
- Use stretch stitches (zigzag or narrow overlock) to preserve elasticity.
- Trim seam allowances at curves before turning to avoid bulk.
- Stabilize necklines with narrow stay tape or a strip of cut-on-bias fabric to keep shape without stiffness.
- Match knits to knits: pair ribbed cuffs with knit bodies to maintain consistent stretch and recovery.
| Finish | Stretch | Chafe Risk |
|---|---|---|
| Narrow turned hem | Low | Very low |
| Bias tape binding | Moderate | Low |
| Ribbed band | high | Minimal |
Reinforcement and Care Tips to Extend Wearability: Washing, Stitch Repair, and When to Reinforce Seams
Wash smart to keep bindings neat: always fasten snaps and close zippers, turn garments inside out, and use a mesh bag for tiny pieces. Wash in cold water with a mild, baby-safe detergent and skip harsh bleach – gentle cycles and low spin preserve elasticity in bindings. When a seam loosens, pick a repair that matches the fabric’s stretch: use a backstitch for woven seam strength, a zigzag or small stretch-stitch for knit bindings, and a ladder stitch for invisible hand repairs along folded edges. For high-wear zones, apply a thin strip of seam tape or a short row of reinforcing stitches on the inside to avoid bulk on the outside.
- Reinforce before relining: if you see puckering or fabric thinning at cuffs, collars, or leg openings, add a few reinforcing stitches before it tears completely.
- Thread & needle matter: use polyester thread for durability and a ballpoint needle for knits to prevent laddering.
- Patch smart: small tear near a seam = stitch it back into the seam allowance; large holes deserve a lightweight patch under the binding.
- Drying tips: air-dry flat or tumble low; heat can shrink bindings and weaken elastic finishes.
Knowing when to reinforce saves garments and keeps little ones comfortable. As a rule of thumb, reinforce any seam that bears weight (waistbands, crotch), receives frequent friction (inner thighs, cuffs), or hosts closures (snaps, buttons). The brief table below shows quick fixes at a glance.
| Location | Quick Reinforcement | Recommended Stitch |
|---|---|---|
| Collar & Neckline | Stitch from inside + tiny stabilizing strip | Zigzag or stretch-stitch |
| Crotch & Seat | Reinforce with a bartack or double backstitch | backstitch / Bar-tack |
| Sleeve & Leg Openings | Apply narrow seam tape under the binding | Straight with zigzag finish |
Choosing Factory Finishes Versus Hand Techniques: Tailoring Recommendations for Fit comfort and Durability
When deciding between mass-produced edge treatments and artisanal hand finishes, think like a parent who wants both practicality and tenderness. Factory-applied bindings often deliver uniform strength, razor-sharp tolerance for stretch, and long-lasting seams that survive dozens of washes – ideal for playroom-ready onesies and sleepwear. Though they can sometimes feel less forgiving at the neckline or leg openings, especially on delicate knits, the right factory finish will compensate with soft-edge taping or a coverstitch designed for stretch. For garments that must endure rough wear or repeated laundering, factory finishes usually win on durability and cost-per-wear.
Hand techniques, by contrast, let you tailor every millimetre for comfort: soft hand-folded bindings, hand-whipped hems, and French seams give extra padding around chafe-prone zones and can be adjusted for an infant’s changing shape. Use hand finishes when you need customization – newborn caps, preemie sleepers, or heirloom pieces - and when minimizing bulk and maximizing skin-friendly edges is the priority. Practical recommendations:
- Active wear (factory): coverstitch/serger bindings for stretch and resilience.
- Newborn/skin-sensitive (hand): hand-folded, padded bindings or flat-felled seams for gentle comfort.
- Mixed approach: factory seams for body panels + hand-finished neck/leg openings.
| Attribute | Factory Finish | Hand Technique |
|---|---|---|
| Consistency | High | Variable – customizable |
| Comfort | Good with soft trims | Exceptional when tailored |
| Durability | Very durable | Durable but depends on skill |
Q&A
Q: What does ”binding” mean in baby clothes?
A: Binding is a way to finish and reinforce raw edges (necklines, armholes, leg openings, hems) by encasing them with a strip of fabric, elastic, or trim. It makes edges neat, comfortable, and often elastic enough for dressing babies.
Q: What are the main types of binding used for baby garments?
A: The most common types are bias binding (single- or double-fold), knit/ribbing neckbands, fold-over elastic (FOE), serged or overlocked binding, self-binding (folded fabric edge), and decorative trims like picot elastic or lace. Each has its own feel and function.
Q: When should I use bias binding?
A: Use bias binding for woven fabrics or curved edges where you need a smooth, flexible finish. Bias-cut strips follow curves well and give a clean, tailored look.
Q: Is bias binding good for stretchy baby fabrics?
A: Not ideal for stretchy knits, bias binding is woven and has limited stretch. For knits, use knit binding, ribbing, or fold-over elastic instead to allow movement and easy dressing.
Q: What is knit binding (neckband), and when do I use it?
A: knit binding uses a strip of the same or similar knit fabric (frequently enough cut on the lengthwise grain or using rib knit), folded and sewn to the opening. It’s soft, stretchy, and perfect for T-shirts, bodysuits and onesies where comfort and stretch are essential.
Q: How do I determine the length of a ribbing or knit binding strip?
A: A common rule is to cut the strip 75-85% of the opening’s circumference, depending on how snug you want it. For delicate baby garments, err toward 85% for easy dressing. Always prewash materials to allow for shrinkage.
Q: What is fold-over elastic (FOE) and why use it?
A: FOE is soft elastic finished on both faces; you sew the raw edge to the garment and then fold it over and topstitch. It’s ideal for leg openings, underwear, and lightweight trims-very comfortable and quick to apply.Q: When is a serged or overlocked binding best?
A: Serged binding (using the same fabric folded and serged) is fast and neat for casual babywear, especially play clothes and items expected to be laundered frequently enough. It gives a flexible, flat finish.
Q: What is self-binding?
A: Self-binding means folding the garment’s own fabric over the raw edge (often by turning a wide seam allowance) and topstitching. It’s minimal, uses no extra materials, and is great when the fabric is soft and finishes nicely.
Q: Are decorative bindings (picot, lace) okay for baby clothes?
A: Decorative trims can be charming, but choose soft, securely sewn options without small detachable parts. Avoid anything with long loops or embellishments that could be a choking or entanglement hazard.
Q: Which stitch types should I use for stretchy bindings?
A: Use a stretch stitch, narrow zigzag, or a serger. If you don’t have those, a twin needle or a stretch twin needle look can offer a flexible, professional finish on a regular machine.
Q: Any special tips for applying bias binding?
A: Cut strips on the bias (45°) for flexibility, press them into single or double folds before sewing, clip curves to avoid puckering, and stitch close to the folded edge for a neat finish.
Q: How do I attach a knit neckband cleanly?
A: Join the band into a loop, divide both band and neckline into quarters, match and pin quarter points, then stretch the band slightly as you sew it to the garment with a stretch stitch or serger. Topstitch if desired for stability.
Q: What widths of binding are typical for baby garments?
A: Common finished widths range from about 1/4″-3/4″ (6-20 mm), depending on the look and elasticity needed-narrow for delicate trims, wider for sturdy neckbands and cuffs.
Q: How do I keep bindings soft and baby-friendly?
A: Use soft, prewashed fabrics and gentle elastics. Finish seams flat, avoid bulky seams in contact areas, and choose low-profile topstitching. Natural fibers or soft cotton-lycra blends are often best.
Q: How durable are different bindings after washing?
A: Knit and rib bindings usually stay comfortable and stretchy with proper laundering. FOE holds up well if sewn with the right stitch. Bias and woven bindings can become stiff if made from non-prewashed fabric. Always prewash and use appropriate stitch/elastic for longevity.
Q: Any safety considerations for baby clothing bindings?
A: Keep trims short and well-secured. Avoid long ties, loose elastic, or small adornments. For sleepwear, follow local safety and flammability guidelines-choose suitable fabrics and secure finishes. When in doubt, make closures simple and robust.
Q: What are eco-friendly binding choices?
A: Use self-binding with leftover scraps, organic cotton ribbing, or recycled knit trims. Minimalist finishes like narrow hems or turned edges reduce extra materials. Prewash and choose long-lasting stitches to lengthen garment life.
Q: Quick troubleshooting: why does my binding pucker or stretch out?
A: Puckering: likely misaligned tension, too much ease, or not clipping curves. Stretching out: band cut too long or over-stretched during sewing. Use stabilizing stitches, adjust presser foot pressure, and evenly distribute ease when attaching.
Q: Any final practical tips for sewers making baby bindings?
A: Prewash fabrics, test your stitch and tension on scraps, use the right binding type for fabric stretch, and prioritize comfort and safety over decorative excess. Small, well-constructed bindings make clothes both lovely and easy to wear. If you want, I can create a simple step-by-step guide for sewing one type of binding (bias, knit neckband, or FOE) tailored to the garment you’re making. Which would you like?
To Conclude
As you’ve seen, the way a tiny garment is finished can change how it fits, performs, and feels against newborn skin. Whether you prefer soft, stretchy cuffs that grow with baby, neatly folded bindings for a classic look, or secure snaps and plackets that simplify middle-of-the-night changes, each option offers a trade-off between comfort, durability, and ease of use. Keep safety, fabric, and laundering in mind, and let the child’s age and your daily routine guide the choice. Try a few styles, read labels, and don’t be afraid to mix practical features with little touches of style – the right binding is the one that makes dressing easier and keeps baby comfortable. Thoughtful finishes are small details that help clothing do its quiet work so you can focus on the rest.