
There’s a particular kind of quiet magic in hand smocking: tiny, regular stitches that gather soft cotton into ripples of texture, turning a flat piece of fabric into a fitted bodice that breathes and moves with a baby’s body. Smocking is both decorative and practical - an old-world needlework technique that adds stretch without elastic, creating garments that feel handmade, gentle, and enduring.
This article walks you through hand-smocking a baby dress from start to finish. You’ll learn how to choose suitable fabrics and threads, prepare and mark your pleats, work the basic smocking stitches, and finish the piece so it’s comfortable and safe for little ones. Whether you’re approaching smocking as a meditative craft or aiming to make a personalized keepsake, the steps ahead are presented clearly and patiently.
Along the way, we’ll highlight tips for neat, even work and sensible safety considerations for baby clothing – choices that preserve the charm of hand smocking while keeping the finished dress practical and wear-ready. If you enjoy slow, tactile projects and the idea of creating something small and beautiful by hand, this guide will get you comfortably started.
Table of Contents
- Essential Tools and Fabrics for Gentle Baby Dress Smocking
- Preparing Patterns and Marking Rows for Accurate Tiny Sizes
- Mastering Hand Smocking Stitches with Tension and Spacing Tips
- Seam Finishes and Care Instructions to Preserve Softness and Shape
- Q&A
- To Conclude
 Essential Tools and Fabrics for Gentle Baby Dress Smocking
Think of your sewing basket as a tiny laboratory where softness and precision meet. For fabrics, favor tactile, breathable choices like cotton batiste, and light-weight linen blends-they pleat beautifully and rest gently against baby skin. Essential hand tools include a smocking needle (or fine crewel needle), a comfortable thimble, sharp embroidery scissors, and a thin water‑erasable or air‑erasable marking pen. For hand smocking, thread choice matters: use fine mercerized cotton or a soft polyester embroidery thread to keep gathers neat without bulk.
- Fabrics: batiste, lawn, voile, lightweight linen blends
- Needles & Thread: crewel/embroidery needles #7-10, two‑strand cotton floss or fine polyester
- Tools: small pins, ruler or smocking pleater (optional), soft tailor’s chalk
- Extras: pre-wash cloth, small iron, stash of narrow ribbons, and tiny buttons
Below is a rapid reference to match fabric weight with recommended needle and thread-handy when you’re deciding what to pack for an afternoon of pleating and stitching.
| Fabric Type | Needle Size | Thread |
|---|---|---|
| Batiste / Voile | #9-10 | 2‑strand cotton |
| Cotton Lawn | #8-9 | 2‑3‑strand cotton |
| Light linen Blend | #7-8 | Fine polyester or cotton |
Preparing Patterns and Marking Rows for Accurate Tiny Sizes
Before you pick up the needle, shrink the pattern down to the baby’s proportions so the smocking lands where it should – across the chest and under the yoke, not at the armpit. Trace the original onto lightweight pattern paper and reduce by the percentage needed (check actual garment measurements rather than relying on labeled sizes). Redrafting darts and armholes by eye will often give odd shapes; instead, use small, measured adjustments at key points (shoulder, bust, waist) and keep the grainline true. Always add your seam allowance back after resizing – for tiny dresses, 3/8″ (1 cm) is common – and cut a muslin or scrap test to confirm fit before transferring smocking marks to your fashion fabric.
Marking the smocking rows is where accuracy pays off. Use a washable fabric marker or tailor’s tacks and a tracing wheel with carbon to create a crisp, even grid. For ultra-small pieces, pin a lightweight interfacing behind the fabric to stabilize the weave while marking. Helpful quick tips:
- Start from the center and work outward to keep rows symmetrical.
- Baste every third row temporarily to hold pleats before stitching.
- Use notches at armholes and center front to align pattern pieces precisely.
Below is a simple guide for spacing and stitch counts tailored to common tiny sizes – use it as a starting point and adjust according to the fabric’s gatherability.
| Size | Pleat Spacing | Rows (front) |
|---|---|---|
| 0-3 months | 6 mm (1/4″) | 6-8 |
| 3-6 months | 7-8 mm | 7-9 |
| 6-12 months | 8-9 mm | 8-10 |
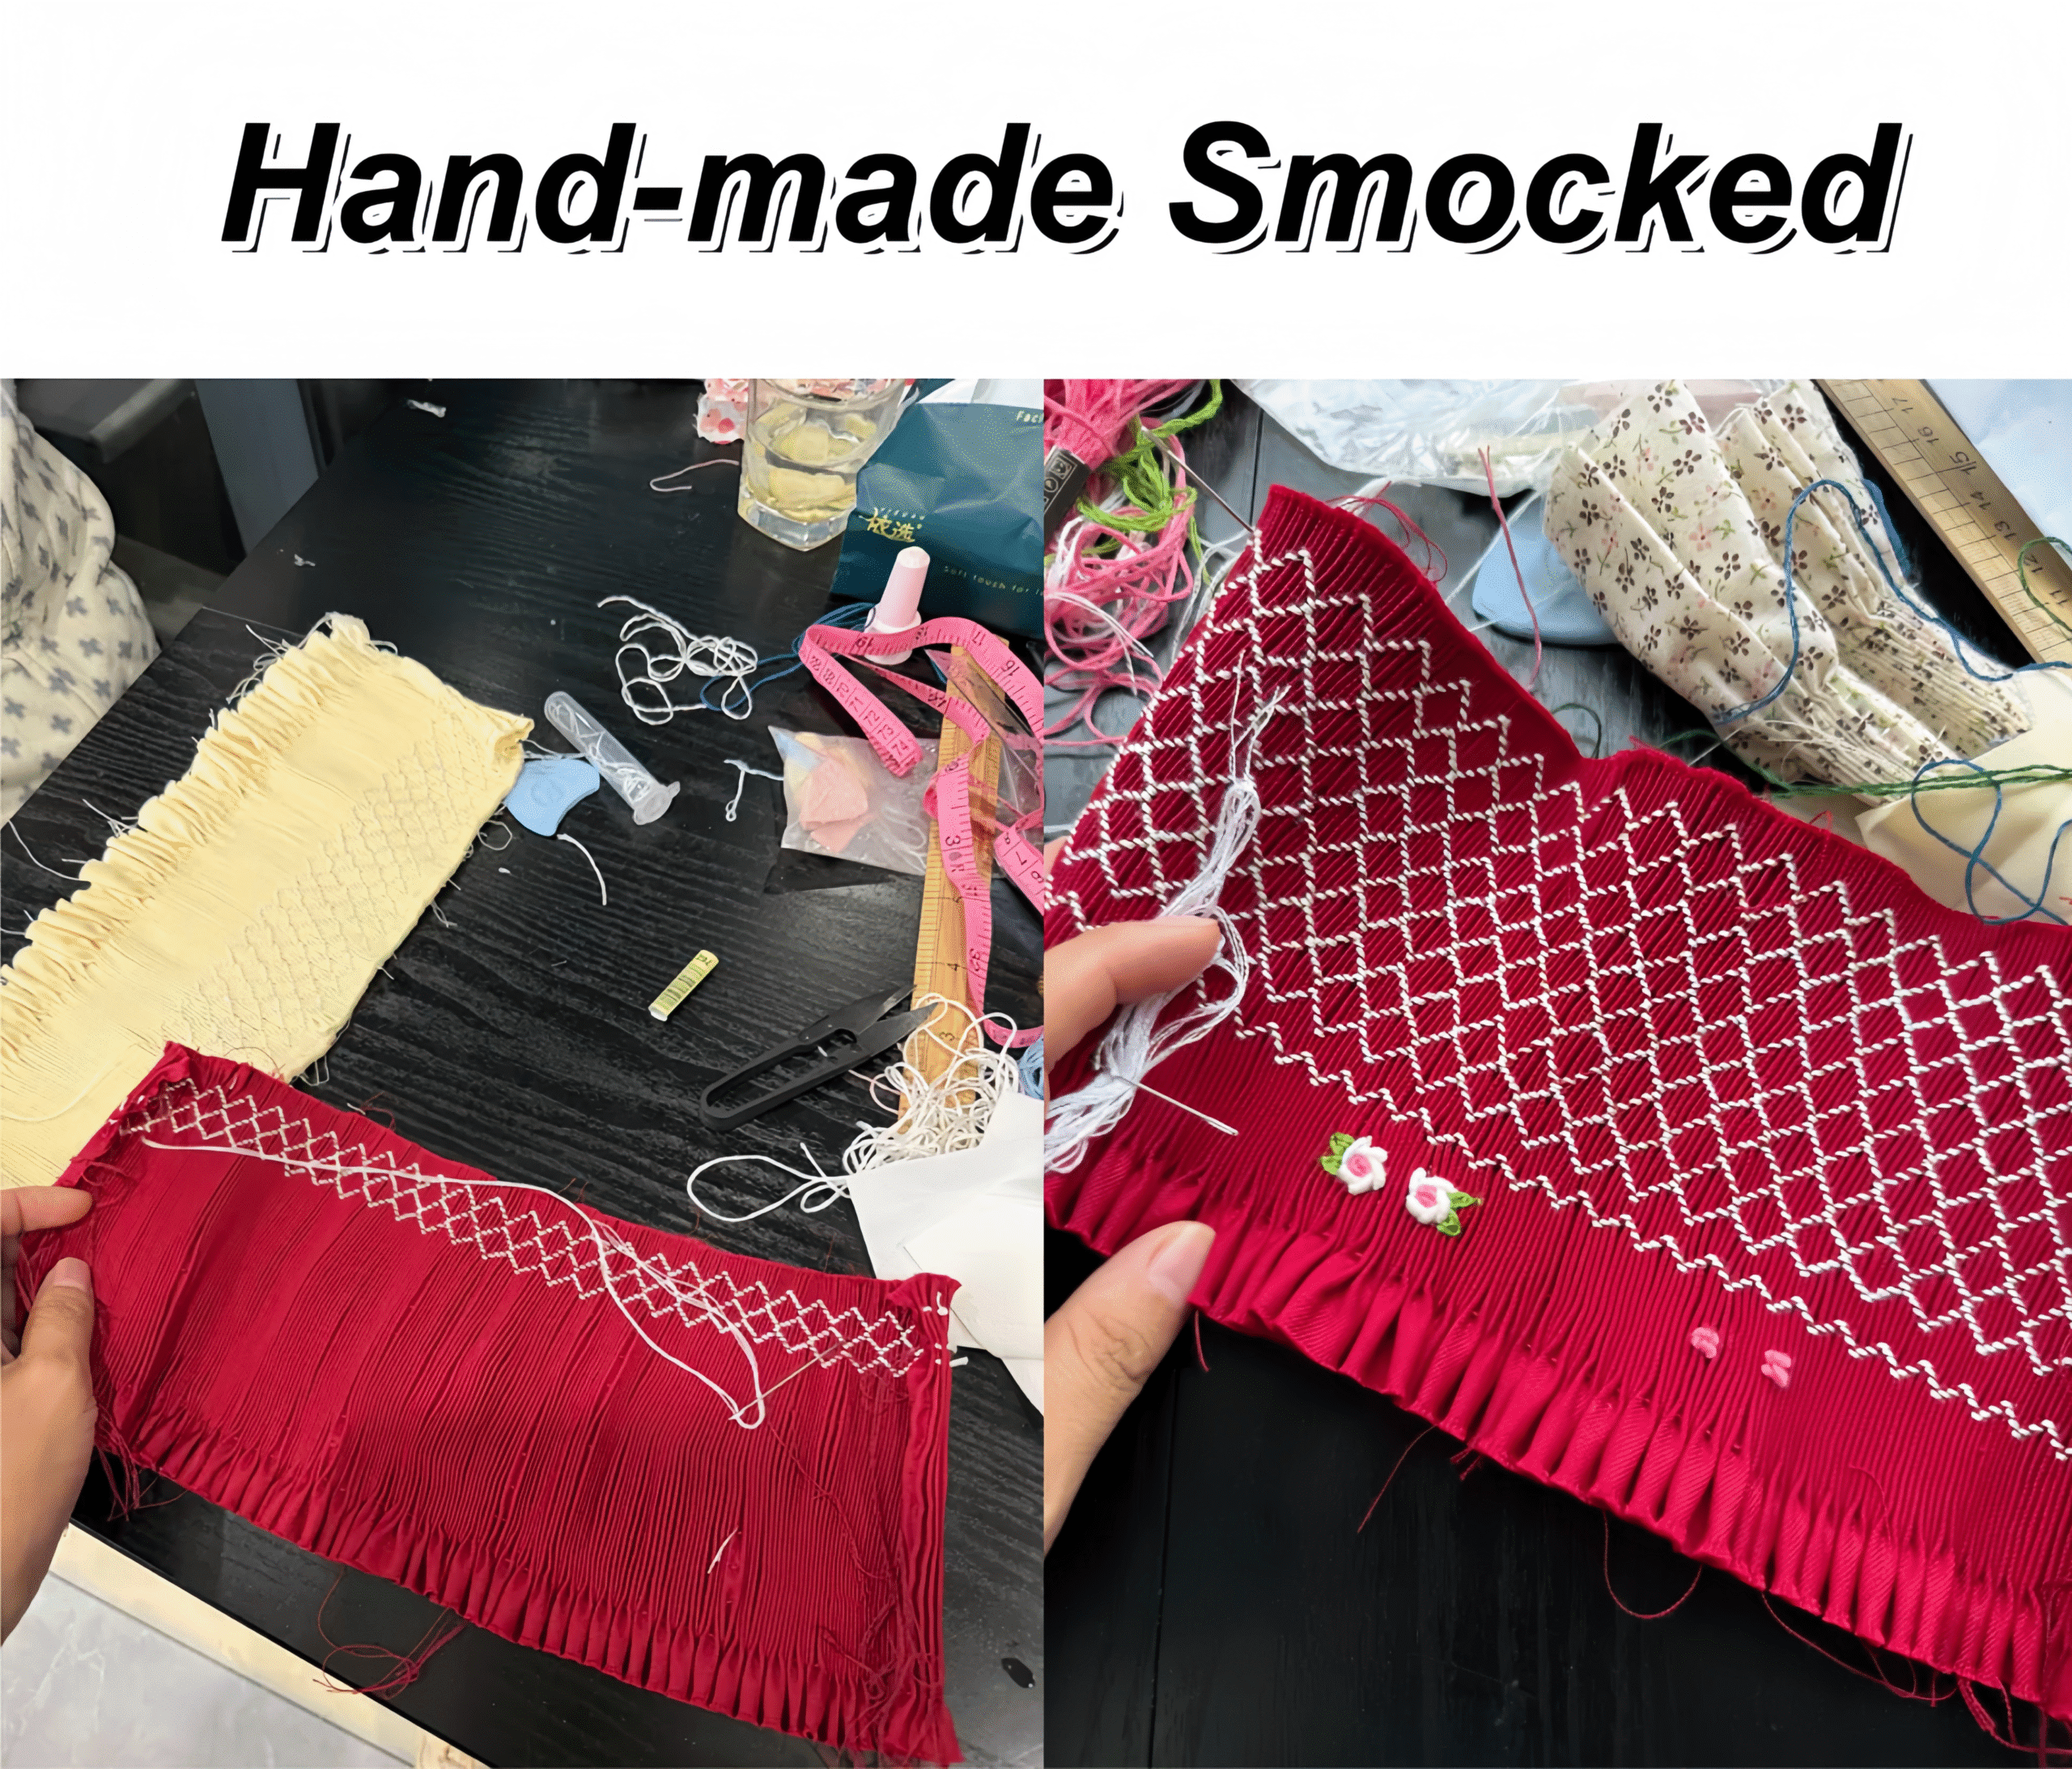
Mastering Hand Smocking Stitches with Tension and Spacing Tips
Find your rhythm by treating each stitch like a tiny promise to the fabric – consistent motion yields a steady texture. Keep the needle angle shallow and use the thumb to guide tension; too tight and the smocking will pucker, too loose and the design will droop. Work a short test swatch first and press the pleats lightly between stitches to check how the gathers sit against the cloth. For crisper wells, pull firmly but smoothly; for a softer silhouette, relax the pull and allow a slighter loop.
Little habits make big differences: mark your pleat grid, stabilize the fabric backing, and count stitches aloud when working rows. Quick practical tips follow to help you maintain even spacing and tension:
- Anchor: Secure the starting thread at the back with a few small waste stitches.
- Test: Always try a 2-inch sample before committing to the dress panel.
- Measure: Use a washable fabric marker or pricking template for uniform pleats.
- Breathe: Keep a relaxed hand to prevent tightening as fatigue sets in.
- Finish: Tie off with a tiny knot and clip close-hide joins in a seam allowance.
| Stitch | Typical stitch length | Recommended spacing |
|---|---|---|
| honeycomb | 2-3 mm | 6-8 mm between rows |
| Cable | 3-4 mm | 8-10 mm between rows |
| Wave/Bullion | 4-5 mm | 10-12 mm for softer gathers |
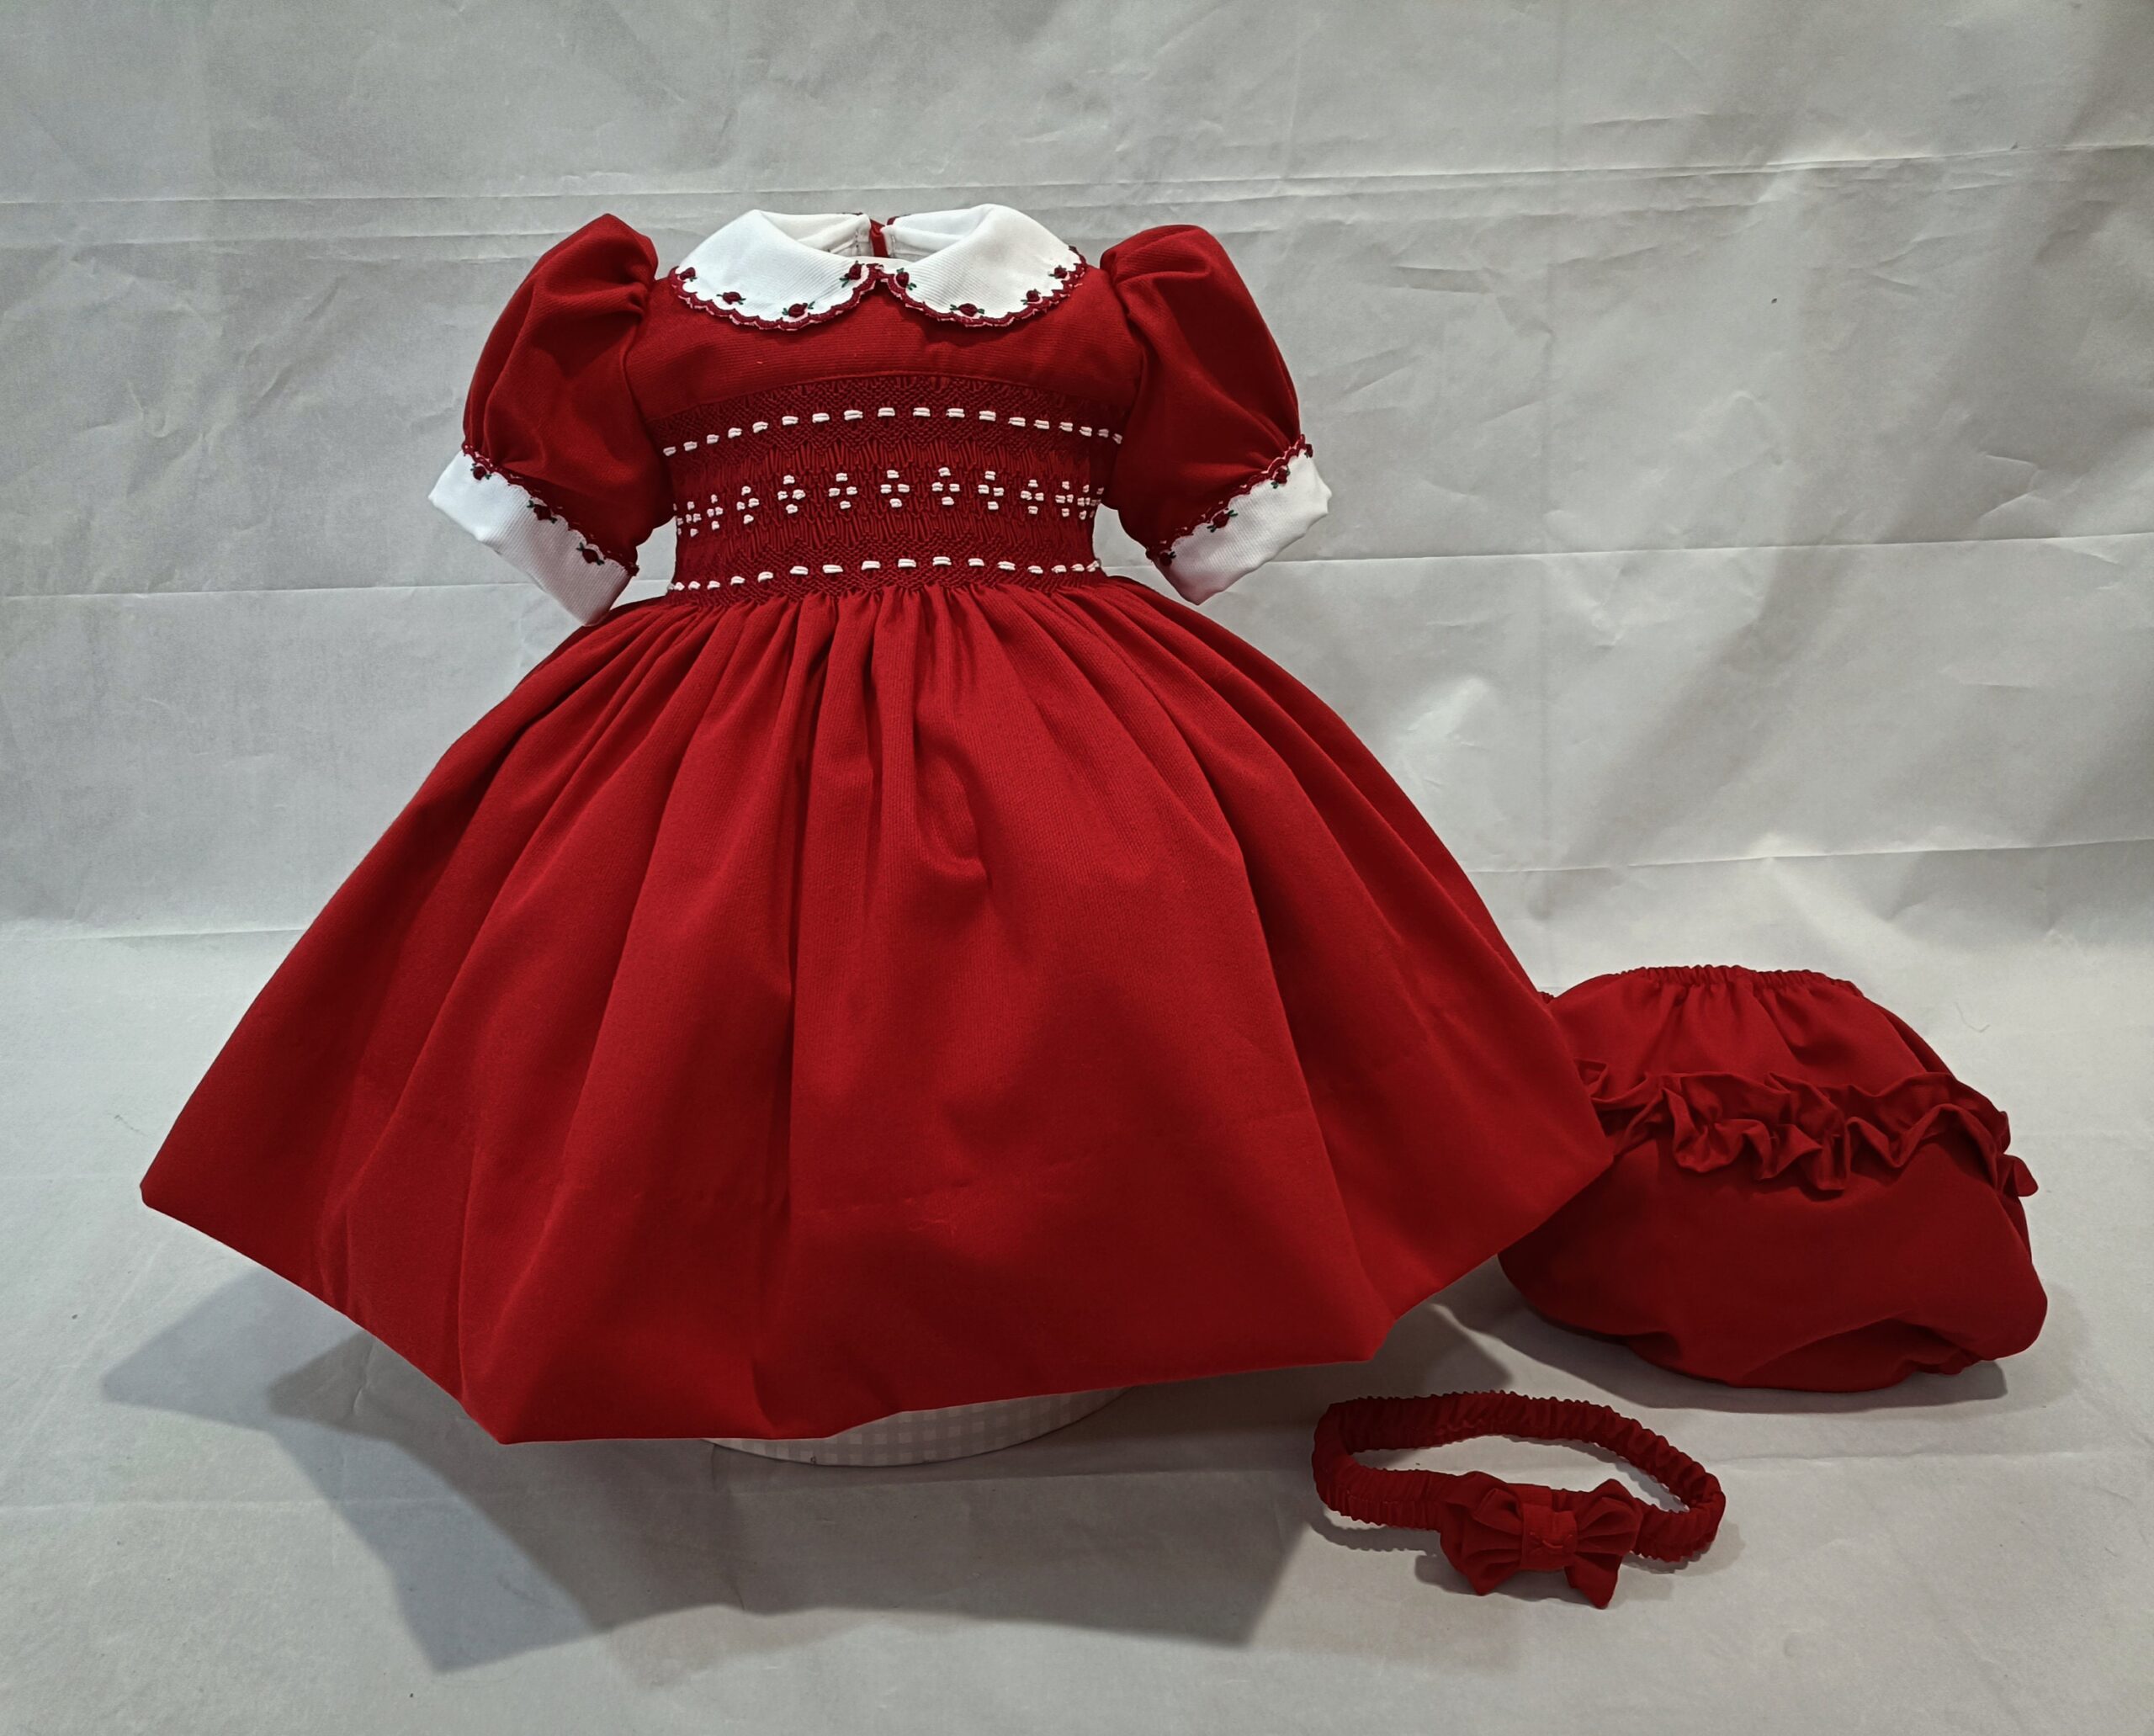
Seam Finishes and Care Instructions to Preserve Softness and Shape
Choose finishes that tuck raw edges out of a baby’s reach and minimize stiffness so the dress feels gentle against delicate skin. French seams and flat-felled seams give a plush, tidy interior for lightweight cotton and lawn, while a narrow serge or zigzag is kinder to knits and flannels as it keeps the edge flexible. Trim seam allowances carefully and press with a low heat using a damp cloth to avoid crushing gathers; clipping curves and easing sleeves will help the garment keep its sweet, rounded shape.
Routine care is as vital as the finish-launder with mild soap, reshape while damp, and let the dress dry flat or hung on a padded hanger to preserve softness and silhouette. Quick reminders:
- Wash: cold or cool water, gentle cycle,fragrance-free detergent.
- Dry: air-dry flat or low-heat tumble briefly; avoid overheating to keep elastic and smocking soft.
- Iron: low steam through a pressing cloth; press smocked areas from the wrong side only when necessary.
- Store: folded with acid-free tissue or on a padded hanger, away from direct sunlight to prevent yellowing.
| Finish | Best For | Effect |
|---|---|---|
| French seam | Light cottons | Soft, smooth inside |
| flat-felled | Medium-weight cottons | Durable, cushioned |
| Serged/zigzag | Knits & flannel | Flexible edge, low bulk |
Q&A
Q: What is hand smocking, and why use it on a baby dress?
A: Hand smocking is an embroidery technique that gathers fabric into tiny pleats and secures those pleats with decorative stitches. On a baby dress, it adds gentle elasticity, a timeless handmade look, and a delicate texture that’s both functional (allows for stretch) and decorative.
Q: Which fabrics are best for hand-smocking a baby dress?
A: Choose lightweight, tightly woven, natural fibers-cotton lawn, batiste, voile, or fine shirting. These hold tiny pleats well, soften with washing, and are comfortable against baby skin. Prewash and press the fabric before starting to allow for shrinkage.
Q: What tools and supplies will I need?
A: Basic supplies: embroidery needles (crewel or size 7-9), fine embroidery thread or perle cotton (or stranded cotton with 2-3 strands), straight pins, ruler or smocking gauge, water-soluble or air-erasable fabric marker, iron, small embroidery hoop (optional), smocking pleater or pleating board/pleating tape (optional), and a pattern or transfer template.
Q: How do I transfer a smocking design onto the fabric?
A: Common methods: mark a dotted grid with a washable marker (use a smocking gauge for spacing), use a pricking-and-pouncing transfer from a paper pattern, or baste a temporary running stitch grid. Keep marks light and within the smocking area so they wash out or disappear under stitches.
Q: What pleat spacing should I use for a baby dress?
A: Typical pleat spacings range from about 1/4″ (6 mm) for fine, tightly smocked work to 3/8″ (9 mm) for a slightly more open look. Smaller spacing yields more rows of smocking and a denser texture. Choose spacing that suits the design and scale of the dress.
Q: How are the pleats formed and secured before smocking?
A: You can hand-pleat by sewing a temporary basting thread along grid marks and drawing it up into pleats, or use smocking tape/pleating paper and a pleating board to machine- or hand-pleat.Secure pleats with pins or temporary tacking to keep them even while you embroider.
Q: What stitches are used in hand smocking?
A: Core smocking stitches include the cable/honeycomb (creates elasticity), wave (curving lines), cable cross, and outline or stem stitches for edges and motifs. Colonials and French knots add texture. Start with a simple honeycomb or cable stitch for a baby dress yoke.
Q: Which thread should I use?
A: For a baby dress, use quality cotton embroidery thread or perle cotton in a fine weight. Stranded cotton with 2-3 strands is common; perle size 8 or 12 works well if you want a slightly textured line. Avoid metallic or rough threads against the baby’s skin; all threads should be washable.
Q: Do I need an embroidery hoop?
A: A hoop can definitely help keep a small smocking area taut and make stitches neater, but it’s optional. Many smockers stitch on pleated sections held flat on a table; choose whatever keeps your work comfortable and even.
Q: How do I keep smocking even across the yoke?
A: Use accurate grid marking, consistent pleat spacing, and a smocking gauge. Work methodically, row by row, and check alignment frequently. If using a pattern repeat, count pleats carefully before starting each motif.
Q: How much time should I expect to spend?
A: Time varies with complexity. A simple, small yoke might take several hours; a full dress or intricate motif could take many sessions across days. Plan for slow, careful work-smocking is detailed hand embroidery.
Q: How do I finish the inside of the smocked area so it’s safe and neat for a baby?
A: Secure all thread ends with small, neat knots or weavings buried under stitches. Trim thread tails close but not so short that they come loose. Consider a backing yoke lining or facing to avoid exposed knots and to add comfort. Ensure no loose threads or long tails that could be a hazard.
Q: Can smocking be washed, and how should I care for the dress?
A: Yes-hand smocking in cotton thread and fabric usually washes well. Use a gentle machine wash or hand wash in cool water, mild detergent, and avoid harsh bleach. Press on the wrong side with a low to medium iron. Test colorfastness first. Re-shaping pleats gently after washing helps maintain the look.
Q: What are common problems and fixes?
A: – Uneven gathers: re-baste pleats and redistribute fullness.- Puckering: check tension; try a looser stitch or slightly wider pleat spacing. – Thread breaks: use a stronger thread or shorter working lengths; avoid over-tensioning. – Miscounted pattern: unpick only the affected area and re-stitch carefully.
Q: Are there safety considerations for babies?
A: Yes. Avoid small beads or loose embellishments in areas the baby can reach. Secure buttons and trims very well, or place them on the back or under a flap. Ensure all threads are fastened and trimmed; consider lining the interior of the yoke to conceal knots.
Q: Any tips for a beginner?
A: Start with a small practice panel using the same fabric and pleat spacing as your project. Learn one or two stitches (honeycomb/cable and outline) before attempting complex motifs. Work in good light, keep your hands relaxed, and take breaks-consistency improves with practice.
Q: Where can I learn more or find patterns?
A: Look for smocking books, embroidery stitch guides, online tutorials, and vintage smocking patterns. Smocking and embroidery communities, workshops, and videos can show techniques step by step. Kits for beginners often include templates, thread, and instructions.
Q: How do I incorporate smocking into a modern baby dress design?
A: Use a small smocked yoke or narrow panel for a subtle handmade accent. Choose tonal threads for an understated texture or a single contrasting color for a focal point. Pair smocking with simple silhouettes so the detail remains the star without overpowering the garment.
Q: Any final creative advice?
A: Treat smocking like composing music-rhythm (pleats), melody (stitch lines), and harmony (color and placement) work together. Keep designs balanced, start small, and enjoy the slow, meditative process. The result is a unique,heirloom-quality piece that celebrates handcraft.
To Conclude
Hand smocking is more than a set of stitches – it’s a quiet way to fold time and care into a tiny garment. With the basic techniques you’ve learned, a few patient hours, and some thoughtful choices of fabric and thread, you can transform a plain baby dress into a textured keepsake that carries both function and feeling.
Work at a steady pace, test your tension on scraps, and keep safety in mind: use soft, natural fabrics, secure your knots, and avoid small or hard embellishments on garments for very young infants. As you gain confidence, experiment with color, spacing, and simple motifs to personalize each piece – the imperfect, human touch is part of its charm.
Whether you’re making a one-off gift or building a small collection of hand-smocked garments, every stitch becomes part of the story. Take your time, enjoy the rhythm, and let the finished dress be a quiet celebration of skill and care.